Introduction to Time-lapse
Time-lapse photography is a technique used to make motion footage using a stills camera. After capturing multiple photos over a duration of time, the sequence is then played back at normal speed to make time appear faster. For example, you might take a photo every second and then play them all back at 24 frames per second. Here is what a time-lapse video can look like:
Manual Mode
Assuming you’re using a DSLR, you will get the best results by setting your camera to full manual mode. By using fixed settings, you will ensure that each photo is exposed identically and that will help produce a seamless video in the end.
In Manual mode, set your camera’s shutter speed, aperture, ISO sensitivity, white balance, and turn Autofocus off. Experience is your friend; practice often and record your camera settings so that you have a good reference to use on future shoots.
Intervalometer
Use an intervalometer (some newer cameras have these built in) to trigger exposures at the desired interval to create your time-lapse sequence. Make sure to choose an interval that is slightly longer than your exposure so that your camera has time to process each image before taking another shot. For example, if you’re taking 10 second exposures, you might use an interval of around 13 seconds to allow for some buffer time.
Choosing shutter speed
Choosing shutter speed depends on what type of motion you’re trying to create. By using a very fast shutter speed, any moving objects in your scene will have little to no blur and they may appear to “stutter” across the frames. For example, if a person quickly walks by your camera during a time-lapse, they might be seen on the left side of one frame and then instantly on the right side in the very next frame. This choppy type of movement is generally not wanted but can be useful in some time-lapse styles, such as tilt-shift photography.
However, if you want to create a smooth, flowing time-lapse, slowing your shutter will add some blur to moving objects in each frame. This is often referred to as shutter dragging. Once the time-lapse sequence is compiled, these slightly blurred elements will appear to blend together in a nice seamless way.
The problem you can run into is trying to use a lower shutter speed in bright daytime conditions. To make this possible, a Neutral Density (ND) filter can be very useful. Basically, these filters reduce the amount of light let into your camera and allow you use slower shutter speeds.
Turn lens stabilization off
Some lenses have an image stabilization feature that helps capture sharp images even with slight movements, like when shooting handheld. The problem with image stabilization in a time-lapse is the gyroscopes keep working, even on a tripod, and can make minor adjustments between photos that will be noticeable in the final video. Turn off lens stabilization and make sure your tripod is steady.
Quick tips
- When possible, use an aperture wider than f/8 to help reduce aperture flicker.
- Once you have your lens focus where you want it, use some painter’s tape on the focus ring to make sure it stays in place during the entire time-lapse.
Interval
The following intervals are suggested starting points only; each shoot will require different settings. In general, you will want to use shorter intervals with a telephoto lens and vice versa with a wide angle.
Also, it’s important to consider the speed you want the scene to appear when choosing interval. For example, a shorter interval between each frame will produce a slower movement in your final video.
- Fast moving clouds: 1 second
- Slow moving clouds: 10 seconds
- Sun moving (wide angle): 20 – 30 seconds
- Sunset (zoomed in): 1 – 2 seconds
- Shadows on the ground: 10 – 20 seconds
- Stars moving (wide angle): 20 – 30 seconds
- Crowds of people: 1 – 2 seconds
- Plants growing: 2+ minutes
Holy Grail
A day to night time-lapse transition can be difficult to achieve and is often referred to as the “Holy Grail.” Here are a few ways you can master this technique:
Shoot in Aperture Priority (AV) mode
This is considered one of the easier methods but it does have drawbacks. Since you will be relying on the camera to determine changes in exposures, you will most likely notice a lot of flickering in the final result. However, you can help eliminate this problem in post by using deflickering software, such as GBDeflicker.
Blend in post
Essentially, you start your time-lapse with optimal settings for current conditions, then stop the time-lapse as lighting changes, re-adjust settings, and continue shooting. In post, you blend your multiple time-lapse captures together by cross-fading them.
Bulb ramping
Bulb ramping, or bramping, allows you to gradually adjust for changing lighting conditions. To do this, you will need to use software (i.e. Magic Lantern) or a remote control with bramping (Promote Control is a common choice). Bulb ramping works by slowly adjusting the exposure throughout your day to night time-lapse.
Equipment
Tripod
Be sure to use a sturdy tripod and weigh it down to eliminate any camera movement.
Intervalometer
Use an intervalometer to trigger exposures at desired intervals. If your camera doesn’t have a built-in intervalometer, this is a must. Which brand you buy is your choice but I’ve had good luck with the cheap 3rd party brands on Amazon for about $20.
Motorized slider or head
Not absolutely necessary, but a motorized slider or a pan/tilt head can dramatically improve time-lapse videos.
Neutral density (ND) filters
ND filters are especially important in daylight conditions. They allow for slower shutter speeds and come in handy when you want to show blurred motion, such as running water.
Extra batteries
It seems like a no-brainer but remember to pack extra batteries. Also, adding a battery grip can be a great way to increase how long you can shoot.
Camera bag
Because time-lapses often require extra gear, bringing a light but roomy camera bag with plenty of padding is essential. Also consider a rain cover if your the bag is not waterproof.
Compiling
To compile your photo sequence into a time-lapse movie, there are many different programs you could use. Some are more basic, like LRTimelapse, QuickTime 7 Pro, iMovie (Mac), Sequence (Mac), and so on. For more serious time-lapse projects that require a lot of editing and compression options, you’ll want to look into Final Cut Pro X (Mac), Adobe Premiere Pro, or Adobe After Effects.
Software
GBDeflicker – Flickering is a common problem in time-lapse footage. GBDeflicker is available as an Adobe Plugin or Windows Application for removing time-lapse flicker.
Magic Lantern – Magic Lantern is a free software add-on that runs from the SD/CF card and adds a host of new features to Canon EOS cameras that weren’t included from the factory by Canon.
Websites
Timescapes Forum – One of the best time-lapse forums around. You’ll find great advice and information for all levels of photographers.
Dakotalapse – Randy Halverson has created an amazing collection of time-lapse videos that are well worth a look. You can also learn tips on camera equipment he used to make each video.
Preston Kanak – Preston has written a fantastic tutorial on day to night time-lapses, including walkthrough video examples.
Philip Bloom – Philip Bloom is well known for his DSLR filmmaking and his blog contains a lot of insightful equipment reviews and photography tips.
Kickstarter – Believe it or not, Kickstarter can be a good place to find new and innovative time-lapse gear. There have been multiple projects for dollies, motion control, and more.
Astrophotography
Astrophotography is an incredible form of photography that anyone can do with a little knowledge on when and where to shoot. You can get started with just about any modern DSLR so don’t worry about spending too much money on expensive equipment in the beginning.
Whether you want to create a time-lapse at night or just take beautiful still images of the Milky Way, the info in this guide can be applied to both.
Location
Avoiding light pollution
Light pollution is a common problem when photographing at night. Even if the sky looks dark to the naked eye, a camera will pick up any nearby light pollution and it will appear as a yellowish haze in the photograph. Try to avoid being near houses, busy streets, or any other significant light sources.
Resources for finding dark skies
NASA’s Blue Marble – Using Google Maps, NASA created an interactive night-lights map that makes it easy to pinpoint darker locations. There is also a newer 2015 version but it uses a black and white color scheme that isn’t as easy to view.
Observatories List – Wikipedia has a lengthy page with links to astronomical observatories. Finding an observatory near you is a good way to locate dark night skies.
Interesting foreground
As beautiful as the night sky is you want to think about the entire composition of your shot and make sure the foreground is also interesting. For example, creating a time-lapse of the stars above a calm lake can create amazing reflections on the water.
Light painting
You could also bring your own light source (such as a flashlight with a long battery life) and “light paint” interesting rocks, trees, or other foreground elements. It’s important to use a fairly low-powered light source, otherwise you may overexpose your photo or add too much light pollution. Since photographing the stars usually means using an exposure of around 30 seconds, even a very dim light will amount to a lot in your final image.
When to shoot
The sun
Unsurprisingly, trying to photograph the stars when the sun is up won’t work. You can get some interesting star photos during the blue hour—when the sun has set but some residual light still illuminates the sky—but to capture more stars and see greater detail in the Milky Way, you should plan on waiting at least 2 hours after sunset.
The moon
The moon is another important factor when photographing the stars. Because the moon is so bright, it too will introduce a lot of light pollution. In general, you want to photograph when there is a new moon or when the moon is completely below the horizon.
However, a quarter-moon can be useful in some situations. Let’s say you have a really interesting foreground, having some small moonlight will help illuminate the ground without being so bright that it washes out the stars.
You can use this moon phases calendar to determine what nights may work best for you.
Time of year
The Milky Way actually has a season if you want to capture the galactic center. In the Northern Hemisphere, the core is most visible from March to October. During the other months of the year, the core will be above the horizon mainly during the day and not at night.
You may have also seen some incredible panorama shots of the Milky Way arching like a rainbow. These are usually taken earlier in the Milky Way season when it rises close to the horizon after sunset. Later in the season, the Milky Way is more vertical in the night sky and it can be trickier to get a full panorama.
Settings
The following settings are suggested starting points only and each shoot will require some experimenting.
When I first set up my camera on a star shoot, I like to begin with an overexposed image (usually with an ISO around 6400) so that I can clearly see the horizon in front of me. This is helpful in making sure the subject I want is in view and also to see how level the composition is.
- Exposure: 20 – 30 seconds
- Aperture: Ideally f/2.8 or faster (Max f/4.0)
- ISO: 1600 – 6400
- White Balance: Around 3500k
- Lens Focus: Manual
- Flash: Off
- Image Review: Off (to conserve battery)
Exposure time & the rule of 500
With a wide angle lens, 30 seconds is around the longest exposure you can use to take sharp star photos. Any longer than that and the stars will begin to “trail” due to the Earth’s rotation.
You can use the “500 Rule” when figuring out what exposure length will work with the lens you have. To do this, take 500 and divide it by the focal length you will be shooting with. For example, if you’re using a a 20mm lens, 25 seconds would be the maximum exposure length you could use before stars begin to trail in your photo.
Disable long exposure noise reduction
A lot of newer cameras include an option for long exposure noise reduction. The way this works is when you take a photo, the camera automatically takes a second shot, then compares the two exposures and removes detected noise from the first. The problem is this effectively doubles the exposure time and creates too large of a gap between frames when creating a time-lapse. If shooting a time-lapse, turn off long exposure noise reduction and do any noise correction in post using editing software such as Lightroom.
Always shoot in RAW
RAW image files contain more data than other formats, which allows you more editing capabilities in post. This is especially crucial for astrophotography.
Finding focus at night
Finding focus at night can be a little tricky since Autofocus will struggle in the dark. Turn your camera’s Live View mode on, point toward a bright star in the sky or a distant light on the horizon (the further way, the better), then manually focus the lens until your reference light is as sharp as possible. If your camera has a zoom button, that will magnify the Live View preview and help you find focus. Next, take a test exposure to double-check the sharpness of the image.
Quick tips
- Once you have checked all your settings, have the lens in focus, and are ready to begin your time-lapse, disable the Image Review setting. This will help conserve battery life.
Equipment
DSLR camera
Just about any modern DSLR is capable of taking Milky Way photos so don’t get too hung up on which one to buy. However, it is worth noting that a full-frame camera will produce better results than a crop sensor (APS-C) because it can use a higher ISO with less noise.
Lenses
Wide-angle lenses are ideal for astrophotography. They have a larger field of view to capture more of the sky and also allow you to use longer shutter speeds without creating star trails. Around 35mm or shorter would be a good choice for a full-frame camera and 24mm or shorter for crop sensors. Ultra-wide lenses, like 11mm, will do even better but can be more expensive. Also try to get a fast lens with an aperture of around f/2.8 or larger. This will let more light into your photographs and you’ll be able to use a lower ISO.
Flashlights & headlamps
Pack at least a couple flashlights, one for walking around and one in case you want to light paint your foreground. It’s also a good idea to bring a headlamp so you can easily go through camera gear and adjust settings with both hands. If you can find one with a red lens, that will help preserve your night vision as well.
Personal gear
Since you’ll be trekking outdoors in the pitch-dark, it’s always a good idea to be prepared and pack extra layers of clothing, food, and even a tent if you’re venturing deep into the wild.
Quick tips
Use an elastic band to keep a hand warmer wrapped around your lens to help prevent condensation building up during your time-lapse.
Processing
Milky Way
Processing Milky Way photos is an art in itself. I mostly use Adobe Lightroom and Starry Landscape Stacker but other image editing software, such as Photoshop, can be used. Although every photo is different, my goals in post-processing are usually:
- Reduce any visible noise and light pollution.
- Adjust color temperature and saturation as needed.
- Increase contrast and clarity of the Milky Way to make it “pop” more.
- Highlight interesting foreground areas.
- Have lots of patience! Processing photos requires a lot of time and practice.
Below are a few handpicked video tutorials from various photographers:
Boosting the Milky Way using Lightroom (by Michael Shainblum)
Editing the Milky Way using Photoshop (by Kenneth Brandon).
Star trails
To create star trails, you can either use the Bulb setting to create one long exposure or you can take many exposures and overlay them in editing software, such as Photoshop. Personally, I like to use the latter method because it allows me to also create a time-lapse out of the same photos.
Creating star trails using StarStax or Photoshop (by Michael Shainblum)
Image stacking
Image stacking is a method of combining multiple exposures to greatly reduce noise. It can also be a very useful way to get both the foreground and background in focus. Let’s say you take 8 photos, all of them at slightly different focal lengths, you can mask them all together in Photoshop to get maximum depth of field.
Image stacking tutorial in Photoshop (by Ian Norman)
Advanced (paid) tutorials
For more info on post-processing, I recommend checking out these talented photographers:
- Video tutorials by Adam Woodworth
- Post-processing video class by Dave Morrow and Michael Shainblum
Software
Mac
Starry Landscape Stacker – By compositing multiple images, this app can significantly reduce noise and sharpen stars to a pinpoint.
iPhone Apps
Star Walk – Very handy for planning nature shoots, especially astrophotography. Using this app, you can estimate lighting and see where key elements in the sky will be. For example, if you want to photograph the Milky Way.
PhotoPills – This app will help you plan landscape scenes exactly as you want them. For example, say you want to photograph a lighthouse with the moon rising directly behind it. PhotoPills will determine exactly which day and time the moon will be at that location in the sky. Another great feature is the Milky Way planning mode that uses a 2D map to see where the galactic center will be.
Aurora Forecast – Aurora Forecast gives you a better chance at catching the Northern Lights. The app is fairly easy to understand, though it also offers a lot of technical info. In general, you want to look for a Kp-index of around 5 or higher in your region of the world. One thing to note is the time estimations are in UTC so you’ll have to calculate the difference if you’re in another timezone. It is a free app but you can also pay $1.99 to have aurora alerts.
Motion Control
Including motion in time-lapse videos adds a beautiful, dynamic quality. You can do this by sliding your camera on a rail, rotating it on an axis, or a combination of both. The following are some of the most popular techniques and equipment to achieve this.
Sliders
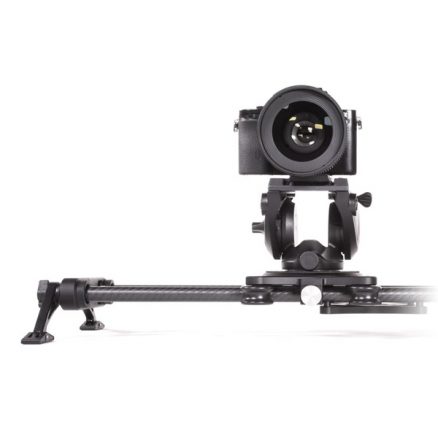
A motorized dolly or slider allows you to move your camera consistently throughout a time-lapse shoot. Usually, this involves some sort of rail that can vary in length (4 – 6 feet is common), and an electronic motor to slowly move the camera. There are manual sliders you can power by hand but those are mainly for real-time video. A motorized slider can move a short increment, take a photo, move again, take another photo, and so on. This is ideal for time-lapse photography.
Also consider what type of controller you want to use, analog or digital. Analog has a self-contained computer than usually attaches to the dolly and that is what you use to program the movement. Newer digital sliders can now pair with your smartphone or tablet for control through an app.
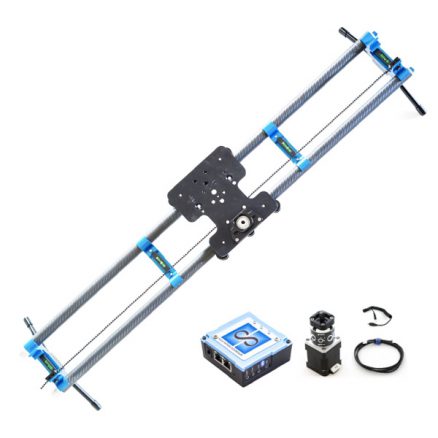
Dynamic Perception
Dynamic Perception has been around for many years and they are one of the top brands for sliders. Their ready-to-run setups start at around $1k and are well made.
The Stage One and Stage Zero and two popular kits to buy.
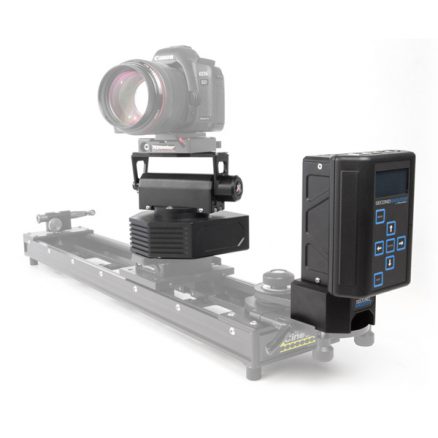
Kessler Crane
The Pocket Dolly by Kessler is a popular choice because of it’s lightweight. However, you also need to buy a separate motor to drive it and the overall package can get expensive quickly.
Others to check out
Pan & Tilt Heads

A number of companies now offer motorized heads that can pan and tilt. The great thing about these heads is they’re typically small enough to throw in a backpack and don’t require as much setup as a slider. Better yet, you can create some really dramatic effects by pairing a pan/tilt head with a slider.
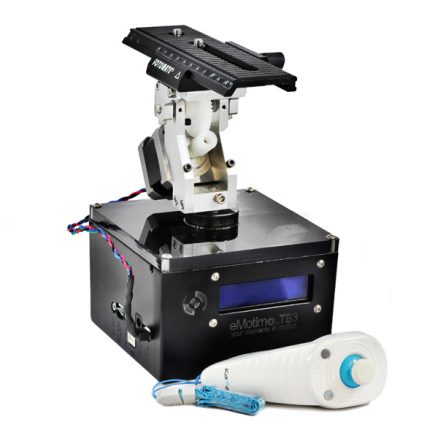
eMotimo
eMotimo offers 3-axis motion control that adds a whole new range of possibilities. The learning curve is fairly steep but the results are worth the effort. The price is also very decent for what you get.
Syrp
Syrp has a Genie head that can pan or attach to a rail for linear motion. A nice feature is the self-contained unit with no external cords to get in the way. They also have a Genie Mini for just panning that is very portable. This is what I personally use and I highly recommend it.
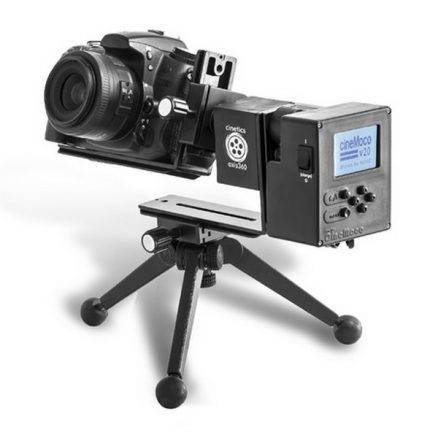
Cinetics Axis360
The Axis360 started as a Kickstarter project and is a good low-cost solution for basic pan or tilt movement. You can even pair multiple motors to pan and tilt at the same time. One motor and controller is currently $400 and you can purchase a rail as well. The main benefit to this unit is the small, lightweight size, which makes it extremely easy to bring on your next photo trip.
One word of caution: the early Axis360 models suffered from a loose bolt that would allow one of the inner gears to get a little sloppy. The fix is easy and Cinetics reports that this issue has been resolved in all new models but it is something to watch for.
Hyperlapse
Hyperlapse is a relatively new technique that is quickly gaining in popularity. Instead of sliding on a short rail, the camera is moved across long distances during a hyperlapse shoot. This is usually done by setting your camera on a tripod, taking a photo, moving the entire tripod a measured distance, then repeating for each exposure in your time-lapse.
The main trick is to find a reference point and keep it in the same location of each exposure. Let’s say there’s a building in your composition. Find a single point of interest, like the front door, then make sure that point is in the same location of each shot you take.
Another tip is to find a location that has some kind of consistent markers on the ground that you could use to help you move the same distance between each exposure. For example, a tiled floor, brick walkway, or even grooves in the sidewalk can aid in measuring your tripod movement.
Hyperlapse tutorial from start to finish (by Untamed Science)
In Post
As a last resort, you could use video editing software to zoom, pan, or tilt. However, the effect is limited and is not a great substitute for authentic camera movement.
Using Adobe Premiere to zoom, pan, and tilt in post (by Michael Shainblum)